Hi friends! In case you didn't already know, I am officially on vacation! Woohoo! As you're reading this I'm in the car somewhere between Indiana and Iowa. Tomorrow we'll be making our way to South Dakota to the Badlands. And let me tell you, the Badlands are most certainly bad. They didn't earn that name for nothing! Today also kicks off the first of many guest posts from some fabulous ladies. the first is from Janee of
Yellow Bird, Yellow Beard. I'm so excited to have Janee here today so I hope you'll also head on over to her
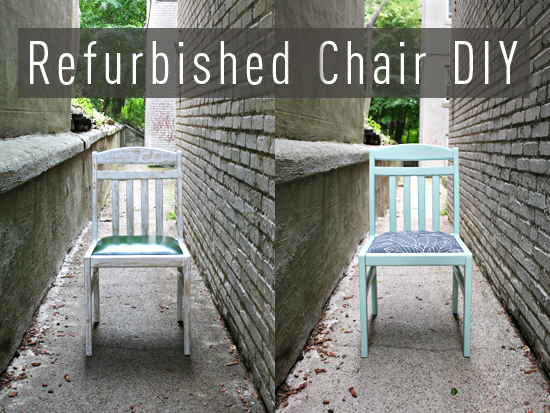
blog to say hi! She's sharing a DIY tutorial for a refurbished chair. Take it away Janee!
----------------------------
The other night The Beard and I were walking down the street when we came across this sweet old chair by a dumpster. I'm sure it must've been a funny sight for anyone who might have seen what happened. There we were going to grab a bite to eat when simultaneously we noticed the chair, stopped in front of it, stood there staring at it, looked at each other, picked up the chair, turned around and started carrying it back towards our apartment. All without saying a word. Hahahaha. I did need a chair for my new sewing desk {don't worry I'll have photos of our apartment set up soon} so it was perfect. And I even managed to turn it into a fun DIY project to share with you guys!
What you'll need:::
A chair
Sandpaper
Paint
Wood sealer {water based}
Upholstery
Scissors
Staple gun
1::: Acquire a chair. You could find one by a dumpster on trash day like I did, or you could just pick one up at your local thrift store like a normal person.
2::: Remove the seat cushion from your chair and sand the wood frame.
3::: Paint your chair in your desired color. After the paint dries give it a good coat of wood sealer. Make sure it's water based sealer! If you use oil based sealer it will ruin your paint.
4::: Now you're going to reupholster the seat cushion. There are several ways you can go about this step. Because the leather that was already on my seat was in really great condition I decided to leave it and just put the new upholstery over the top of it. Especially since I didn't know what the stuffing underneath was going to be like this was the easier route for me. If you've got a seat cushion that's all torn up and nasty, or if you want to go all out and redo the padding as well, then you'll want to completely remove your upholstery at this point.
5::: Set your seat on the ground with your upholstery underneath for measuring. Cut your fabric leaving about 6 inches or so on each side for folding and stapling.
6::: If your seat has a rounded side like mine did start with the flat side. Fold your upholstery over the edge of the seat, I also folded my upholstery over on itself before I stapled it for extra security. Now go to town with your staple gun. Don't be shy with those staples. You wanna make sure this fabric isn't going anywhere. After you finish your first side turn the seat around and do the opposite side. It's really important that you do the opposite side next. Pull you upholstery really really tight {you might need to get someone else to help hold the fabric or do the stapling} and staple away. Now the opposite side of my seat was rounded so I had to do pleat like folds every once in a while to keep the upholstery looking neat on the top side.

7::: Now come the corners. The way I did this was sort of like wrapping a Christmas present. I folded the very corners up so they made a point, stapled, then folded the rest on top of it and stapled. I tucked the point part into the fold too so it wasn't loose and flapping around.
8::: After I finished the corners I pulled the two remaining sides really tight as I stapled between the corners. Be sure you're checking how the top side of your seat is looking as you go along. You don't want to get finished and realize the top is all messed up. Remember the under side doesn't need to win any beauty contests, it's the other side that counts.
9::: Once your finished with your seat cushion reattach it to your wood frame and voilá you've got a brand new chair! Who says you can't have a chair that looks exactly how you want it to?
This whole process took me about three hours. Perfect for a weekend project. Looking for something less time intensive? Check out my other tutorials
HERE.
xoxo
Janee